
How to make a fence in minecraft
Minecraft is also known as a sandbox game popular with people of all ages. This is a game where players can enjoy creating their planet using various construction components. It enables individuals to develop their creativity. After establishing a virtual environment, an individual must safeguard it with specific protection tools. Anyone can attack from wherever, and his might has the potential to destroy the entire globe.
This implies that an individual must fortify his boundaries to avoid induction from any direction. This is accomplished by erecting a stronger fence all around to assure safety. This wall cannot leap easily, and the player must use the fence gate if it is opened to serve as a good defense. Each fence is unique in terms of strength and look. However, this post will discuss how to construct a fence in Minecraft in general.
Materials required constructing a fence
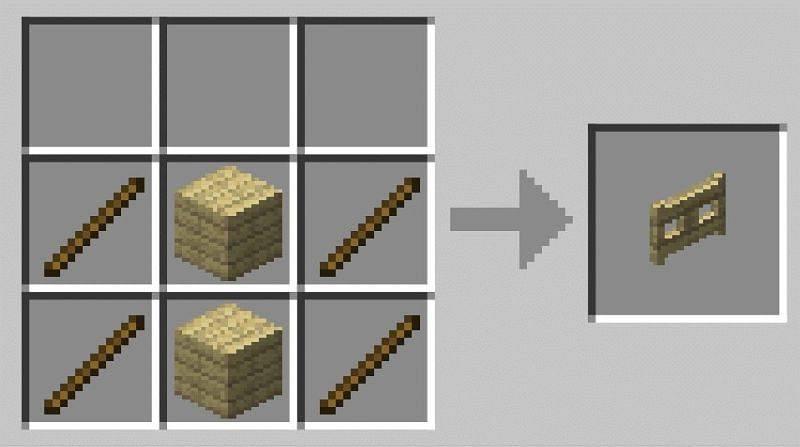
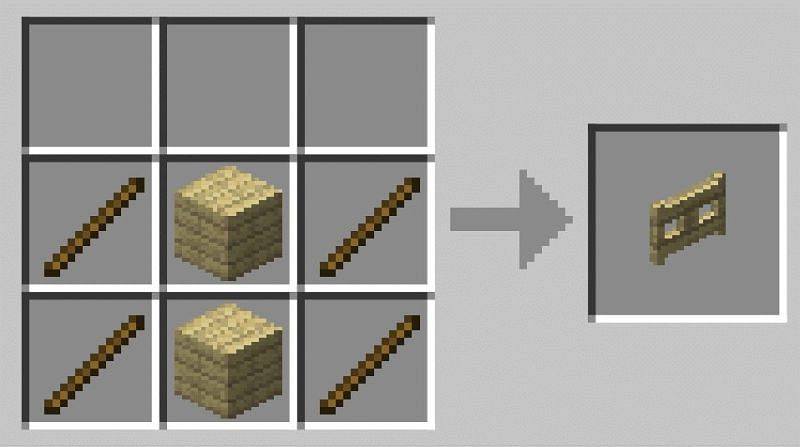
Before continuing, the Minecraft player must collect particular recipe components for constructing an oak fence. There are various types of fences, each with its texture and appearance. A fence can be constructed using whatever materials are available, such as two sticks and four planks for a wood fence, or Nether brick for a Nether brick fence, and so on. Individuals must appropriately amass material. Include the material in the Hotbar for future use.
• Construct a crafting table
Before continuing, an individual must construct a crafting table. To create a crafting table, an individual must enter the crafting menu and add the necessary items.
• Open the crafting menu
Before crafting any item, he must ensure that the crafting table is set up in a 3X3 grid. He must now stand in front of the grid.
• Construct a fence gate
Once the material is gathered, construct a fence gate to make it easier to open and close the fence for other players or objects. The fence serves as both a door and a fence.
• Create the fence components
Once the material has been obtained, arrange it in the crafting grid in a certain arrangement.
This pattern is unique to each type of fence.
• Include this fence in your inventory
A fence would be constructed after the relevant items are added to the crafting grid. The player must now transfer this fence to his inventory for further processing.
How to construct a fence in Minecraft
After gathering the necessary materials, an individual can begin constructing a fence. He must follow the steps below to construct a fence:
Step 1: Locate an open space
Once the materials are gathered and the fence gate is constructed, an individual must locate an open place to construct his fence.
Step 2: Construct the fence's sides
Once an open region has been picked, begin building the fence's walls using the material provided in the Hotbar. Place sufficient material on one side of a fence to construct it. Now, place another fence on the opposite side of the first, and Minecraft will automatically construct the full perimeter. Continue in this manner until all sides are constructed.
Step 3: Fit the fence gate
When constructing the sides of a fence, an individual must leave a one-block space on the front side. Place the already-created gate in that location. After it is installed, the entire fence is complete.
#minecraft
#fence
#build
#gate
#construct
Sharing = earning
1,000,000 views = € 1,000
100,000 views = € 100
10,000 views = € 10
1,000 views = € 1
500 views = € 0.50
250 views = € 0.25
100 views = € 0.10
50 views = € 0.05
25 views = € 0.025
10 views = € 0.01
And much more
- Comments (0)
- Recommended
- Milestones
No comments yet
Here are your recommended items...
Here are your milestones...

