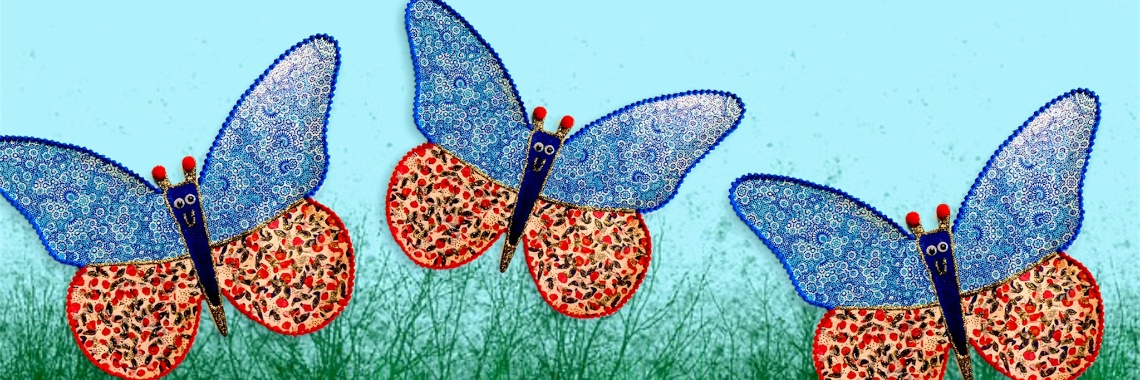

Decopatch Butterfly

Butterflies crafting is for every age. Decopatching is also a technique that children have quickly mastered. Decopatch is another word for Decoupage, we in the Netherlands also call it napkin technique. With pieces of torn thin paper, paste an object to give the item a new look. Decopatching on a flat surface is not difficult and very fun to do even for younger children.

What you need for it? That's not much, you know. You can already decopatch with pieces of napkins and a jar of napkin glue and a tassel. That's it.! Of course, there is also “real” Decopatch paper on sale, in the most beautiful designs. That paper was made specifically for the Decoupage technique. It is a hobby that is done all over the world and it pimples all sorts of objects, such as tables, vases, pots, boxes, etc.

The MDF butterfly is 6mm thick and 30cm wide. Available at Trixx Creative. but you could also saw a butterfly out of wood.


Today we decorate MDF (wooden) butterflies, which are flat and therefore easy to cover with torn paper. When the glue is dried, put another layer of the same glue over it, and then the butterfly is also lacquered. Thanks to the protective lacquer coating, you can easily wipe the butterfly with a (little) damp cloth, so you can enjoy your workpiece for years. We made 2 variations, with Decopatch design paper. Of course you can also use plain napkin paper for it. Then remove the bottom 2 layers of the napkin so you only use the top layer (with the print) to stick on.


So the above butterfly has 2 different prints, for the upper wings blue and the lower wings red. But you can also stick 2 prints together, even 3 or 4 prints mixed up is fun! And the bodice can just be stuck with, like the pink butterfly below. Finish the butterfly with ball tape, colored ribbon, rhinestones, glitter or other ornaments.


then €5.99/month after 14 days
Start your 14-day free trial now to publish your sponsored content. Cancel anytime.